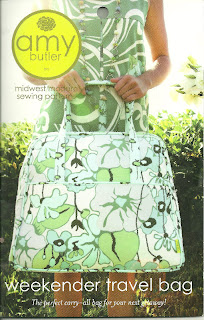
Last year when I was thinking of making a bag for short trips away, I started running into the name Amy Butler. Or more specifically, into the name Amy Butler as modifying the noun Weekender. Amy Butler, it seems, is a well-known designer and her Weekender Travel Bag is pretty much the pinnacle of amateur bag making—at least, as measured by sewing blogs.
I was at first turned off by complaints about the pattern, the difficulty and the sheer number of hours that making the Weekender required. But slowly I became intrigued by just how many people had taken the time to log their experiences making it. It amounted to a huge body of collective experience: what worked, what to avoid, tips and shortcuts and additions. How could I not use such a reference?
And once I did, how could I not add to it?
So here is Part 1 of my Amy Butler Weekender experience: namely, a summary of the best information I could find in reading through the blog posts.
- There are old and new versions of the pattern. As far as I can tell, the new version uses peltex instead of timtex, which was harder to work with; and fusible instead of non-fusible interfacing. I made a point of searching for the new version, which looks like this:
- It is expensive to make. Budget $60-80, even if you buy everything at discount.
- Prepare for it to be somewhat time intensive. I made mine over 3 long evenings.
- You will have to handstitch and baste the layers. This is why most people considered the bag a headache or especially time-consuming. I happen to enjoy handsewing and used the time to listen to podcasts.
- Nearly everyone added interior pockets as there are none in the pattern. I added a simple pocket to hold my laptop, and used this zippered pocket tutorial (I'm not sure how I found this tutorial, but it is linked to in nearly every post with a zippered pocket addition).
- You can machine stitch the lining in. This wasn't important to me since the handstitching gave me more podcasts to listen to, but it's good to know if you just want the thing done.
- Most people added an X-in-square pattern to reinforce the strap on the body. Some also lengthened and widened the straps for extra comfort and the option of carrying the bag over one's shoulder or added a removable shoulder strap.
Some of the blog posts I found helpful or inspiring in some way (in Fall 2011):
be sure to check out her series of blog posts, Days 1-5, in April 2008
this blog included the single most helpful tip I found, which was to make the cording with stitch witchery
two more additions which I used: magnetic clasps on the outer pockets, and feet on the bottom
additions include: a bias tape zipper pull, magnetic snaps & a detachable shoulder strap
the above blogger's first Weekender
more solid tips
these photos show why it's worth taking time to match the print on the outer pocket to the main panel
I used a flickr search to view different color and print choices. Conclusion: the bag looks great in almost any combination
includes a link to a tutorial for making a handle grip
I loved that she used her treadle machine to sew the heavy layers
she also mentions, as do others, that you need less cording than is called for
although I had every intention of choosing a large, colorful floral print for my bag, I ended up with the same colors as this woman's beautiful bag & can't help but wonder if I was influenced by her striking photos
I love that she documented how much she was able to fit into the finished bag—including her sewing machine!
used manufactured cording to save time, lengthened & widened the handles, & added a secret zippered pocket to outside pocket
and still more:
http://www.madebybird.com/4-weekender-bags-in-4-weeks/
http://www.madebybird.com/4-weekender-bags-in-4-weeks/


This looks fantastic! Love your fabric choices.
ReplyDeleteThank you for putting all these links together in one place. I'm going to make my first attempt in May and it is helpful to read the experience of others!
ReplyDeleteThanks for all your research! You've saved me a lot of time by putting it all together in one place. Thanks again.
ReplyDeleteThank you for taking the time to leave a comment, Riva. I really appreciate it and hope you enjoy making the bag as much as I did.
Delete