Tuesday, May 11, 2010

playing with yarn, part 2 (finger knitting)

It's all but impossible to do something and photograph it at the same time. I'm grateful that my son is willing to go through the sequences of what we do in our yarn group so that it can be shared. This doesn't capture the feeling of sitting and talking, leaning over and learning from each other, but hopefully it allows someone else to get a glimpse of what we have been doing lately.

Finger knitting is easy, tactile, and requires no equipment. A lot of young children (mine included, in years past) seem to enjoy seeing how quickly their piece grows. There are two methods that I know of.

Finger Knitting Method 1
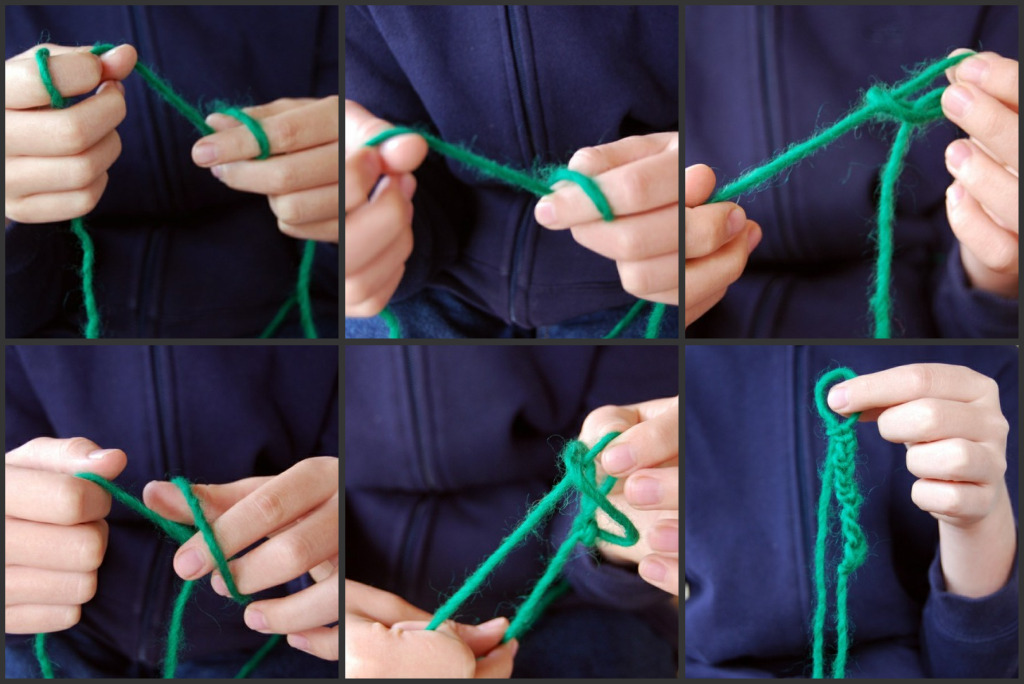
Although the following method is sometimes called finger knitting, I call it finger crochet. It's a way to make a chain stitch without a hook.

First, the slipknot:
Once that is done, you continue to make a series of slipknots using your fingers. Just reach through the loop, grab yarn from the long end of the slipknot, and pull it back through. Continuing this, you create a chain:
Adding a crochet hook can feel a little unwieldy at first. It helps to remember to turn the hook up when catching the yarn, and down when pulling the yarn through.

Finger Knitting Method 2
This method is much closer to knitting as we think of it. You cast on by weaving the yarn around your fingers--first one way, and then back again. Once you have yarn on both sides of both fingers, you will bring the yarn straight across all four fingers as in the last picture of this sequence:
Now make your loops. Bring the yarn that is wound around your fingers up and over the yarn that is going across the fingers. It helps to bend your finger so the loop can just slip. Bottom yarn over top yarn, like so:
Continue with each finger in turn. Bring the bottom yarn over the top yarn for the pointer, the middle, the ring, and the pinkie fingers. Then you'll pass the yarn across the palm side of your fingers again and bring the bottom yarn over the top for the pinkie, the ring, the middle and the pointer fingers. Back and forth, forth and back. It goes pretty quickly:
In about a minute, you'll have a piece of knitting that looks like this:
Some years ago, one of my boys made scarves for his aunts using this method of finger knitting. They are narrow, but they knit up so quickly that it's possible to do a nice long scarf in a single sitting. If you need to, you can also transfer the loops from your fingers on to a large knitting needle until you're ready to pick up again.

Knitting is nothing more than making yarn into fabric by creating a series of loops, and the best demonstration of that is knitting directly on your own fingers and making the loops with your other hand.

Monday, May 10, 2010

playing with yarn, part 1 (handspinning)

We've started getting together with friends to do things with wool. The ultimate aim is to teach knitting to parents and kids who are interested, but there's so much around knitting that we decided to do some lead-in activities first.


Because we live in an agricultural county, all of us have seen sheep in fields, watched them get sheared, and touched unwashed wool. We pulled out clean, carded roving and rolled it around in our hands to see what happens when it's twisted. The drop spindle is just a tool to help with that twist, and it can be made very simply with a toy wheel, a short length of wooden dowel to fit inside the wheel, and a brass cup hook:


You put it together like this:


And screw the cup hook into the top. This is a top whorl spindle, and it spins a little faster than the bottom whorl type.

That makes for a tighter, thinner yarn.

It also makes it a little easier to get the hang of spinning, I think.


After the spindle is assembled, you need a leader to attach the wool to. We used a loop of cotton string slipped around the shaft and hooked under the cup hook.


K showed us that an easy way to start spinning was to roll the spindle along one's thigh.


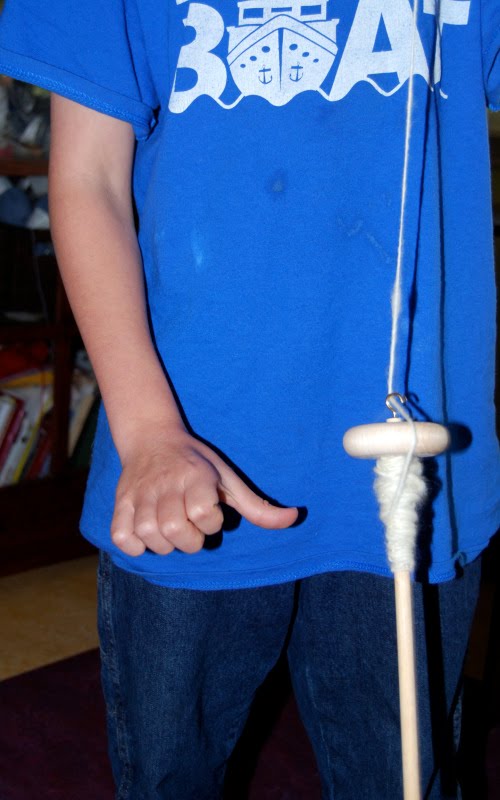
Or you can stand up and set it twirling with your thumb and forefinger.


I'm not really a spinner but I often think that someday when my life settles down, I might become one. It's very soothing and somewhat hypnotic to watch wool pull and twist into yarn. It also made for a fun first day of our yarn circle.

Friday, May 7, 2010

homemade yarn swift


A short while ago, I mentioned to my knitting buddies that I don't own a yarn swift. Whenever I need to wind yarn, I ask my agreeable husband to hold out his hands and tilt this way and that until I have a ball.


But real knitters use a swift, it seems, and my friends urged me to get one. I did consider it until I realized that there are too many styles and prices to easily choose a single model. As I was googling, however, I came across many versions of homemade swifts:


from a broken patio umbrella


from a lazy susan


from tinkertoys


and this one, made from scrap wood and widely copied.


I mentioned to my husband that a homemade yarn swift would be a nice thing to have and not surprisingly, he jumped at the chance to be freed of having to stand like a statue every time I begin a new knitting project.


A few hours in the garage, and he had a finished swift. He used the latter pattern, adding a few curves and some rubber feet. It's beautiful, and it spins like a dream.


I especially love the fact that it breaks down into a few simple pieces for easy storage.


At the moment it's tucked in an old pillowcase, which will eventually be modified for a better fit.


My husband recently started his own blog to chronicle a robot he is making from an electric wheelchair. If you're of a geeky bent, take a look at it here.
Related Posts Plugin for WordPress, Blogger...