Friday, December 19, 2014

santa hats for everyone

Our local fabric shop was promoting fleece this holiday season. One of the patterns was of my son's favorite football team. It was also red. Red fleece...Christmas...my Santa hat-loving son...hm.

I've finally learned that using a good pattern saves time. This pattern worked well, though even the largest size was too small for C. I cut it about 1/2" larger all around for him.
Realizing that any red print fleece pattern personalizes a Santa hat, I looked for and found music-themed fleece for ukulele friends.
Do you know people who love cats? fishing? books? travel? soccer? Almost certainly there is a printed fleece for it.

Monday, December 8, 2014

felted sweater purse and coffee sleeves

Years before I had a blog, I made a felted purse. (It was this pattern, extremely easy to knit in a gorgeous Noro yarn and I'm not kidding, I have never had so many strangers stop me on the street and offer to pay me to knit for them. I always just pointed them to the web page, but it's a testament to the pattern and the yarn.)

I thought about this little handbag as winter was setting in and the summer bag no longer seemed appropriate. However, I've got another knitting project going right now and really just wanted something quick and functional. Hence:


(Please pardon my unprofessional photo retouching. The handles don't really glow like that. Unfortunately.)

This was an almost fully-salvaged project. The body of the bag is an old boys' sweater that had been felted in the wash. I felted it further to bring the size down and to add strength. It also added thickness, which made it a little trickier to work with—something I'll have to remember next time.

I think you can just see the remains of the ribbed waist at the top here:


The two-way zipper is from a carry-on suitcase that had fallen apart.

And the lining is my aunt's old jumpsuit, which had shredded after one too many washes. It already had a pocket, which now holds a phone or wallet. I added the requisite iPad pocket, as well, and in retrospect wish I'd added interfacing to make it firmer. It's just a bit flimsy for my taste.


As for the straps, I have S to thank. He wanted to make himself a belt. While we were looking at necessary supplies, I saw that I could get a length of leather strapping material that seemed like it would just work. Cut in half and riveted to the body of the bag, it did.

In learning about leather finishing, I came across this recipe for a homemade wax. This was rubbed into the straps after dyeing, and it brought them from being rather stiff to feeling softer and more pliable. D asked me to fix the old broken dog leash* and after riveting the two snapped halves together, the wax also worked wonders as a reconditioner.

leather dog leash before (top) and after wax conditioner
And that was it. Not a fancy project at all, but it suits my needs right now. I really appreciated having a more winterized purse the other day when I was caught in a sudden downpour without an umbrella. Between the leather wax and the wool's natural water repellency, the purse came through just fine.

But my favorite part of the project is not the bag, it's the pair of reusable coffee cup sleeves cut from the felted sweater sleeves and roughly (very roughly) embellished with glow-in-the-dark yarn.

The glow feature is more fun than practical. But the felted wool is a perfect insulator.


I plan to carry the coffee sleeves with me at all times. And now I have a bag to keep them in.


*This particular post is revealing us to have some unsavory hoarding tendencies. Please ignore.

Saturday, November 15, 2014

guitar in, featherweight out: music in middle age

This blog saw me pick up an ukulele for the first time, create a group to start playing with friends, and mess around in a million different ways trying to make instruments and cases and crazy headstock hats for ukes.

The group is still humming (strumming?) along, and some of us have even started music lessons. There is a whole genre of literature on taking up a musical instrument later in life, all of which I'd like to read some day. Meanwhile, it is clear to me just from a casual survey of friends that there is a special pleasure in learning music after years of raising children a/o focusing on work.

It could turn into a real problem.

This summer my teacher casually mentioned that I might enjoy playing tenor guitar. I didn't know what a tenor guitar was; Bob explained that it was a transition instrument originally made for tenor banjo players in the 1920s and '30s, and tuned CGDA like the tenor banjo. It had multiple tuning options, though, one of which was DGBE, like a baritone ukulele.

Hm.

Last week an old tenor guitar popped up on craigslist. You know what happened next.


It's a 1950's Stella, sold in catalogs at the time for around $23, less than a quarter of what I paid for it 60 years and several scratches and dings later. The neck has been reset, and the tuners have been replaced; but it still plays fine as far as I can tell.

Elvis played a Stella tenor in the movie Frankie and Johnnie (1966). It's a brief segment of this clip from about 0:10 to 0:20.


The only catch for me is that age is also inspiring me to pare down; and a guitar, even a little one, hardly fits into the downsizing spirit. So I went to the same craigslist and sold the Singer Featherweight.


There were good memories tied to this machine. My older son named her Betty and learned to sew (and to oil and adjust machines) on her. He made quilts, pajama bottoms, and Halloween costumes over the years; but his interests have changed, as well, and I prefer sewing on the 201 and 301. So the Singer is gone, and the guitar is here, and that seems to sum up for me how what we value changes over time.

Or there's this: the night before S was born 16 years ago, I stayed up late talking with my childhood friend Rel. A few hours later, my water broke and I called another friend, Carey, who came to be with 5yo C during the home birth.

As it happens, I saw both of these friends in the last week. Rel now plays fiddle and mandolin. Carey and I play ukulele together.


Monday, October 6, 2014

recent and future knitting projects

Clearly I've lost the habit of blogging. The boys are growing quickly, and I feel keenly aware of the passing of time. These days when there's a choice between doing things and the recording of doing things, I tend to opt for the former. I don't even have the patience to document the processes; S now uses my digital camera, while I take spotty pictures with a phone.

Yet I appreciate having this log of life and projects over the past five years. Without it, for instance, I wouldn't have remembered that it was a full three years ago (!) that I bought the yarn which finally became a pair of socks.
Making Waves sock pattern by Pam Gordnier
When I had finished this project, S asked me to make him a necktie. He wanted it in navy, and he wanted it in seed stitch. This pattern worked perfectly.

My favorite part, however, was adding the keeper loop in the back. S chose his Maker Faire exhibitor wristband out of the ribbon box, thus reinforcing all my tendencies to hoard bits of material that "could be used for something."

Next up is another request from S: a cardigan with cables and a shawl collar. He's given the nod to this pattern. Let's hope it's not another three years before it's finished.

Tuesday, July 8, 2014

a whole new bag

Where does a year go? I have no particular excuse for not blogging since May of last year, just a general impatience with sitting down at the computer these days.

Both boys are now in public school, C at the community college and S at an alternative charter high school. More time is going with the family here, and with friends, here.

The old freecycle fridge was moved and works just fine, save for a tendency for the tiny interior freezer compartment to frost over.
And there are always new projects.

Most recently, I decided to make myself a bag after looking fruitlessly for one that wasn't: a) huge or b) expensive. My old purse had fallen onto decidedly hard times—
—and I wanted something a little brighter for summer, anyway.

The dimensions were determined from the size of my iPad2 (with a little extra room on top, this was approximately 11"X9"), and wallet (about 4" deep).

Since it was cobbled together rather than planned, what I have here are a few notes, many of which come from the experience of making the Weekender bag.

The sides went together first, with pockets (one zippered, one gathered) and straps in place. The main material was a heavy home decor/canvas-y print I'd originally hoped to make the Weekender with, and the straps were from a remnant of aqua-colored vinyl. Every piece was backed with heavy duty fusible interfacing (Pellon 71F). The sides are approximately 14"X12" with 1/2" seam allowances. The finished straps 1"X48", with about an inch eventually disappearing into the seam.
Sides and bottom went on next. It would have been easier to do this as one 4"X29" strip, but I didn't have that option and instead pieced it all together from more vinyl scraps.
Right side out:
Finally, there was a lining (quilting cotton with a lighter interfacing, made to the same dimensions as the outer shell—no photos of this part, unfortunately) and a zippered top. I used this tutorial to make it and if I ever do this again, I hope I remember to leave the zipper open at one end so that the lining can be sewn to the bag by machine instead of by hand.
I'm liking this little tote more than I would have thought. By customizing it, I could put in just what I need and no more. It holds wallet, phone, hairbrush, keys, paper, pen, and hooray, my iPad in a barely noticeable zippered pocket. As simple as it is, it is my favorite feature.
All of which has me wondering what it is that makes a good bag. Do you have a favorite daily carrier and if so, what is it that you like about it?


Wednesday, May 15, 2013

frozen bananas à la Bluth

What are you going to be eating on May 26? This has been the topic of many conversations in our house. On that date, Season 4 of Arrested Development will be released, all at once, on Netflix. 


We talked about a few possibilities for our family viewing party: hot ham water, candy beans, juice...but really, there is only one sensible choice, and that is frozen bananas. The banana stand is at the heart of the Bluth Company, after all. And while no one in our family would really enjoy cornballs or mayoneggs, there is no one who doesn't like frozen bananas.

Chocolate-Covered Frozen Bananas


You need: bananas, chocolate, butter, popsicle or caramel apple sticks and (optional) nuts. Ideally, the bananas would be slightly riper than shown here. The stick will split a green banana, but will sink in nicely to a lightly freckled one.

We have one child who loves almonds, and one who doesn't like nuts at all, so I alternate between both plain and crunchy bananas (ie, nuts and no-nuts).
Cut the bananas in half, push the stick up the base, and place them on a tray to freeze for at least half an hour, and up to overnight.
Meanwhile, chop the nuts. 
When the bananas are frozen, melt the chocolate over a double boiler (or in a pot nestled in a larger pot) and add enough butter to bring it to the consistency of, say, mayonnaise. Chocolate melted alone will be too thick to coat easily.
Because I don't have a dipping pot, I spread the chocolate on the bananas with a frosting spatula, seen above. Then, depending on your preference, you can either roll the banana in nuts or place it back on the tray to freeze again. But work quickly, as the frozen banana starts the process of hardening the chocolate almost immediately.
That's pretty much all there is to it. Whether or not you watch Arrested Development, a frozen banana is just about the perfect treat on a hot summer afternoon.


Saturday, May 11, 2013

old refrigerator (part 2)

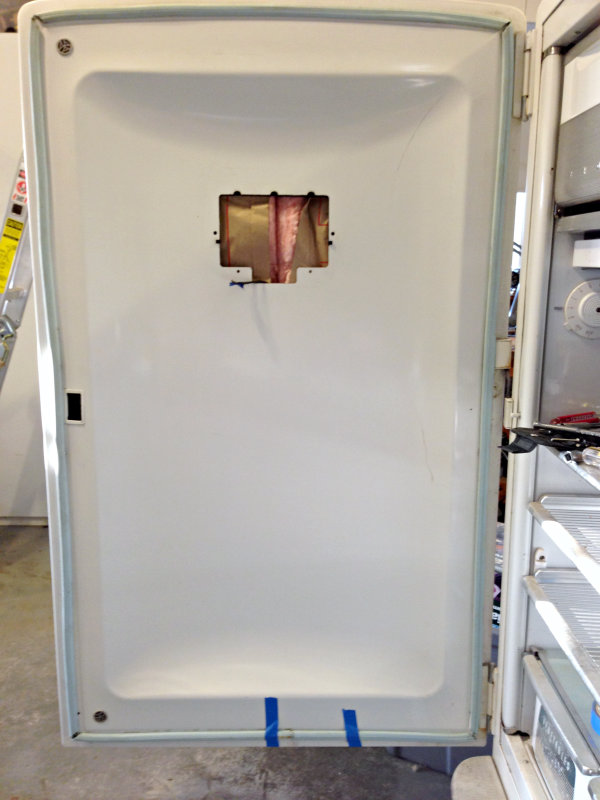
After sanding and repainting, I though I'd just wipe down the gasket. Unfortunately, the dirt was more embedded than I realized, so the gasket had to be removed. This is the point where one thing led to another...

First the interior panel had to come off—


—which revealed the insulation. It looked fine, except for that lower left corner:


Which led me to look more closely at the bottom bracket:

gasket pulled away from bottom bracket, revealing rust and corrosion
bottom bracket removed
What do you do in this case? Do you take out the insulation and repack it? I hadn't figured on getting this deep into an old appliance. While trying to decide what to do, the insulation began to flake off by itself. Finally, I gave up and just removed the cross brackets, letting it all fall out.


Surprise: more rust.


Which meant more (rust-inhibiting) spray paint:


And new insulation. One consolation: the new giant scissors were perfect for cutting the batts.


And the modern paper-backed batts went in easily:


(Note for next time: don't leave the insulation unattended.)


The sanded and repainted bottom bracket:


The gasket was soaked and scrubbed:


And then the whole thing went back together:


In this photo, the butter dish still needs to be reinserted and wired, and blue tape is holding the botom gasket on while the adhesive sets, but it is mostly together. I hope. It still has to be moved, plugged in, and tested. Part 3 of this project may be awhile in coming.


Monday, April 29, 2013

projects simple and not-so-simple

Sometimes projects skate along just as you imagined them, and sometimes—most times, I've come to believe—the project seems to grow in both breadth and depth the farther you get into it.

The Straightforward Project: Old Scissors

Last weekend DH and I decided on a whim to visit a flea market. We never do this, so it was extra fun browsing tables full of old dishes, board games, car parts and aloha shirts. On our way out I spotted this pair of giant scissors and bought them on a whim. They were old and rusty, but they were the largest pair of scissors I had ever seen. I wondered if they might be brought back to working condition. For $2, it seemed worth a shot.


A little steel wool, and some marks began to emerge:
R. Heinisch, Newark, NJ, USA
And on the reverse...
before sanding
"IF IT"S Detmer, IT'S THE BEST"
I think that's what it reads. Not so sure about the last letter of Detme-.

A web search on R. Heinisch mentions production between 1835-1914, when the company was bought by Wiss; and a glance at a 1915 Wiss catalog confirms that the Heinisch name was not retained. These scissors are around 100 years old.

After I had done all I could with the steel wool and chrome polish, I took them to a sewing machine repairman to be sharpened. His charge was only $9, but the scissors turned out to be for paper, not cloth. The difference, apparently, is in the angle of the bevel: dressmaking shears are angled at 30-45 degrees, while paper scissors are angled at 15 degrees. This is why one never cuts fabric with paper scissors and vice versa. Who knew?

In any case, it was a straightforward little project, just a bit of elbow grease and a visit to the repairman. Now what will I do with this humongous pair of office snips (shown here with our regular scissors for comparison)?


The Expanding Project: Old Refrigerator (part 1)

Another Freecycle find. I saw the listing once and ignored it; but when it was relisted, I couldn't resist saving it from the dump. The woman who offered it assured us that surface rust aside, it worked just fine. 
Indeed, the inside was quite clean:

I assumed I could sand down the rust and give it a new coat of paint; and my first efforts seemed to bear this out (color differences are due to photographing before and after photos at different times of day in a poorly lit garage):
the front

the latch

the side
Several coats of paint later, the fridge seemed good to go:
DH replaced the frayed power cord and I figured a good wipedown of the inside would do the trick.

Then I got to the gasket.

To be continued...


Related Posts Plugin for WordPress, Blogger...