Showing posts with label ukulele. Show all posts

Sunday, January 27, 2013

violin case to ukulele case


Once the Grizzly was made, it needed a case. My first plan was to try and revise the Gaspar gig bag, but then I lucked into this old violin case on freecycle. It turned out to be a perfect fit for a soprano ukulele.

As with the Grizzly, my documentation is spotty; but it's a fairly straightforward conversion. The old lining comes out and a fitted, padded lining is glued in its place. I used wood glue to attach fabric to plywood, but Super 77 made a smoother, stronger adhesion whenever foam was involved.

Some notes if you make your own version:

  • try to keep the nap of the fabric running the same direction
  • dry fit all the parts before you commit to glue
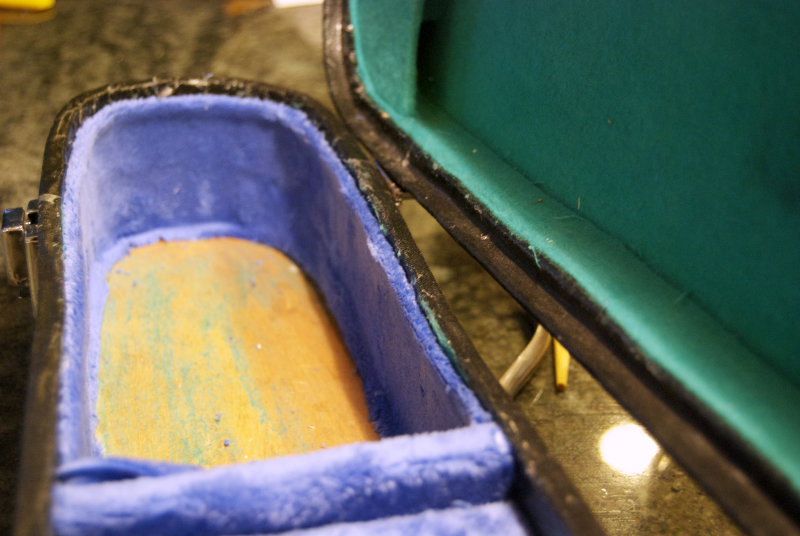
  • don't be afraid to revise along the way (pictures below show how much revision I ended up making to the neck support before I was happy with it)
  • feel free to substitute your preferred materials or what you have on hand.

materials used
wooden violin case
1/2" velcro strapping
piled fabric (mine was a scrap of Minky), about a yard
1/2" high density foam, about a yard
particle board or thin plywood scraps
wood glue
Super 77 spray adhesive
leather scrap from an old belt
short wood screws
corrugated plastic scraps
decorative paper
Mod Podge

lining removed from bottom half

cross-section: fiberboard, foam, fabric
wood glue brushed inside case
new lining added around edge
the old lining pulled out easily
small compartment under neck; lid is pressure fit
a broken belt used for the compartment strap
belt cut down and attached with short wood screws
the fully padded body area

Above the headstock, a removable container made from coroplast scraps and covered in origami paper 
Another compartment in the lid can store spare strings and papers

If you do make your own case, please consider linking to it in the comments below. I'd love to see other designs and ideas.

In other ukulele news, my ukulele group has grown over the last year, so I started a new blog for us here. If you enjoy uke talk, I hope you'll visit.


Wednesday, January 23, 2013

grizzly ukulele kit (daisy)

instruction manual on top

In December 2011 I had just begun playing uke and was also home with a nasty cough. The two converged together into a rush of web browsing, and eventually I came across this diy ukulele kit, on sale at a price that was far lower than the cheapest starter instrument. Of course I ordered one.

neck, body, miscellaneous pieces

Basic as it was, it sat around for many months before I dared to try and assemble it. I don't know much about wood, and it felt incredibly daunting to turn pieces of wood—even pieces that were precut and partially assembled—into a playable instrument.

step 1: gluing the neck to the body

But I eventually started, and soon after I ran into David Iriguchi of Iriguchi Ukuleles. I confessed with much embarrassment that I was starting a kit. Way back in March at the Reno Ukulele Festival, David's concert keystone uke was the first to make me realize what a truly fine instrument sounded like. So it felt akin to telling a sculptor I was going to make a dog out of Playdoh.

step 2: gluing fretboard to neck

But David was characteristically kind and encouraging. He advised looking up other people's chronicles of their kit builds, and said not to worry too much about precision because it would probably turn out okay.

drying

The instructions directed that the fretboard be put on before staining, but the bridge put on after. If there's logic to this, I don't understand it. I thought afterward that I would have rather put the fretboard on after staining, as it was hard to tape up the bottom curved edges well. 

clamping the bridge to the body with the only tool bought for the project. Cost: $3.

The only modification I made was adding a sound port to give me some direct sound feedback. This is a feature that many of David's ukes have, and I really liked it when I tried them last year.

holes stuffed with wadded newspaper and other surfaces wrapped with painters tape for finishing

What's not documented here is all the sanding and finishing. I had thought it would end with the fine grit sandpaper, but then I read about filling the wood grain and sanding that down, too. Then there was staining, cleaning up the leaked areas, drying, and finally spraying several light coats of lacquer.

ready to add tuners and strings

It was rather tedious toward the end, but worth it for the smooth finish on the body. The stain's not perfectly uneven, but in a way that I can live with. Overall, I'm happy enough with how it turned out.

the daisy uke

The kit is branded with the Grizzly name. I wanted to put a bear sticker on the headstock, but couldn't find anything suitable. What I did find was a sheet of daisy stickers. It was S's idea to put a daisy in the sound hole, as well. Now it feels a little like overkill, so I'll probably remove the stickers eventually. Meanwhile, we've gone from calling it the Grizzly to calling her Daisy.

I can't finish this post without mentioning DH's huge contribution to it. It initially sounded a little thunky to me, so he used a tuner and some filing instruments to bring it to a better intonation. This is not something I would have had either the knowledge, patience or courage to try myself; but I'm very grateful that he did. I sold the Dolphin in October, so this is now the main soprano I reach for.

Every time I play it, I remember how I was afraid to start, and how it turned out okay.

Do you have any projects like that?


Saturday, December 22, 2012

ukulele reindeer antlers

If only I could stop at the ukulele santa hat, I wouldn't feel quite so insane. But no ukulele Christmas is complete without a round of Rudolph, the Red-Nosed Reindeer, and that calls out for a matching headpiece. 

Uh, doesn't it...?

This was just a couple of chenille stems wrapped around the headstock and with a glittery red pom-pom glued to the front. I wanted to be able to take it on and off, so started with a little hook, which was formed around a ruler.


The chenille was wrapped around the headstock horizontally, caught on the hook, and bent up and over the top—


—and twisted around the other side.


Nose glued on.


Antlers formed from another stem any old how.


The Flea headstock is rectangular, but the majority probably have this pointed tip in the middle. For those, a different configuration might work better:


DH saw these and cautiously asked if I were planning on making ukulele hats for every holiday. He said it in the tone of someone who has their foot halfway out the door, so I reassured him: No, of course not. These are just for the party.

But we'll see.


ukulele santa hat


When opening the Christmas decorations box this year, I noticed a little Santa hat that probably sat on a doll's head in years past. This year it looked perfect for the ukulele, so that's where it went.

And then I realized I couldn't stop there. We had an ukulele club Christmas party coming up.

I didn't think to start photographing the process until I was nearly done, but it isn't brain surgery and I'm sure you'll be able to adapt it to your own needs.

I eyeballed the hats into isosceles triangles, making them roughly 3" wide, which was the width of my headstock. I was using leftover knit fabric from the Santa hat I made last year, but it should be about the same whether you use fleece or felt or fake fur—anything that has a small amount of stretch to it. Running the warp of the fabric vertically from the peak to the center of the brim will help with the stretch (in other words, the selvedge should run parallel to the silver ruler, below).


A quarter-inch seam took the width down to where it would fit snugly.


All the trim was glued on. I used fabric adhesive because it gave me a little bit of extra control winding that feathery trim, but you could also use a glue gun or anything else that can attach fabric to fabric.


The final, and I think somewhat critical, step was gluing the tops down so that the hats could sit compactly on the headstock when the ukes were in playing position. I folded right over the seam and just added a dab of glue above the trim.


And here's the new, mass-produced version for my club friends. I actually like it a little better than the original due to the softer materials used.


Corny? Very. But also fun, and fun is what we're after when we play.


Sunday, September 9, 2012

ukulele family

Have you ever seen Uke Minutes? They're great, and they often have an easy diy sensibility:
My version was made with an old fence plank because we had a pile of them in the backyard. Screws we had, as well, and it was an easy trip to the hardware store to get a handful of tool hooks.
This is how the resident ukulele population has grown in the last several months. There's the Duke, and the Gaspar--both of them relics of my mom's collection. Between them sits the blue Dolphin, now quite chipped and battered from life with two teen boys. The bookulele and a Lanikai that was a birthday gift from DH round out the little party.

Nobody needs five ukes, but I like playing all of these—they each sound and feel a little different. The Gaspar is extremely lightweight and has a soft, sweet tone. The Duke is bright and punchy. The Lanikai is ornate, sturdy and solid. It's a concert size, which I'm still getting used to. And the poor old Dolphin has quickly become the resident beater uke, easy to pick up and walk around the house with, or take in the car if I know I'll have to pass the time somewhere. I love it the way you love a favorite teddy bear.

Do you suppose I could fit a sixth hook in there...?


Wednesday, September 5, 2012

keith builds an ukulele

C and I went back to Keith's workshop over the weekend. He and C talked about C's lap steel guitar project, specifically about setting up the homemade bandsaw Keith gave him to use for it.
Keith was in the middle of an ukulele commission for a Canadian client. He was about to start the bracing, which he planned to model on the unbuilt Martin he had acquired years ago. The Martin stamp is faintly visible above one of the braces.
We also got quick demonstrations on neck shaping:
and wood bending:
The last time we visited, Keith showed us a chunk of black walnut. Now it is quickly taking shape:
And maybe I'll get to show you the finished instrument someday. Or perhaps Keith will put it up on his own website.

January 2013 update: The finished ukulele can be seen here.


Monday, August 13, 2012

summer project #3: fixing the bookulele

It's mid-August, and we're only on project #3? Drat, I had such big plans, too.

I guess it was yet another summer where the calendar looks so promisingly empty in May but gets filled up day-by-day with friends, movies, house and yard work, and a certain amount of heat-induced laziness. And the one project I did manage to do lately is really just a refinement:

Although the bookulele played fine initially, over time the cardboard body began to bow from the tension of the strings. I also felt dissatisfied with the neck, which was not even with the fretboard but stuck out just enough to feel wrong.
So this weekend I took it apart and put in some very rough bracing cut from scrap wood.
Then I filed down the neck so it was more even with the fretboard, sanded it smooth, and started the stain/finishing process all over again.
This was the 5-minute rig for spraying lacquer on: a wire clothes hanger, a paint stick, a bike stand, a plastic dropcloth. Not very professional, but it worked for this purpose!
Here's the reshaped and refinished neck:
And here's the bookulele, not looking a whole lot different than it did back in April but feeling better in my hands:
I didn't trim the strings because, frankly, I'm not sure how much I'll be playing this. The action is unpleasantly high, even after taking the saddle down a little (not a lot, as I was afraid to go too far). And it just doesn't have the sound that makes me want to pick it up. It's a cardboard body, after all. I imagine that within a year I'll be reusing the strings, bridge and neck for something else.

But as crude as this little uke is, I learned a lot from doing it—not just about the build process, but also in some way about music, as well. It's always that way, isn't it? Making things is an approach from a different direction.

With that in mind, I want to give a grateful shout-out to the friend who passed her old bass body to the boys. C talked with Keith about it, bid on a used neck on eBay, and helped his brother clean up and make the bass playable again. They've had their hands all over this instrument and now have a better understanding of how it plays than if they had purchased new. That, to me, is the perfect outcome of a good project.


Thursday, August 2, 2012

keith's workshop

Lisa recently wrote a post about the value of networking, and I can tell you that she lives this. Last fall when I was visiting and noticed her ukuleles, I asked if she'd ever thought about learning to play—the idea had just recently begun to take shape in my own head.

Lisa instantly said yes, mentioned her musician/luthier friend Keith, and picked up the phone to call him right then and there. After Keith had patched up the Gaspar uke, he gave us a couple of introductory lessons.

Fast forward 9 months and now I'm happy to call Keith a friend of my own (thank you, Lisa). He has taught us many more things since that day, met my music-obsessed son C and invited him to play trumpet—an instrument C was not at all comfortable on but willing to do with Keith's encouragement—in his Friends of the Library band, and has of late taken time out of his always-busy schedule to guide C in building a lap steel guitar.

C and I went to visit this week when I asked Keith to set up the new concert ukulele DH gave me for my birthday. His barn workshop is a fun place, because you never know what you will see upon entering.

cases & necks
tools, bundles of horsehair, vintage radio equipment
banjos, bandsaw, molds
chair seat made from a drum head
baritone ukulele parts
an assortment hanging from the stairs
3-string MJB coffee "canjo"
Next to it, an 8-string ??? made from...
...a Dutch oven lid
custom guitar stenciled with a design by Keith's friend, Bob Armstrong

And these pictures barely scratch the surface. There are rows of violins, a sousaphone modified with parts from the hardware store, a gigantic harmonica, and lots of wood. There was a pot of beeswax left over after Keith had spun off his honey; he also keeps bees.


Outside, he had rigged up a solar wax warmer to melt this down into candle wax.


I've loaded this post with photos even though they're not the best, because it's the only way to convey how rich and amazing Keith's workshop is. Maybe you can understand why C and I love to visit. It looks like somewhere you could discover anything at all, doesn't it?


Be sure to visit Keith's website, particularly his instructions for making instruments with kids: keithcary.com


Related Posts Plugin for WordPress, Blogger...