Although I've filled old socks with rice to heat the dog beds on cold nights, I'd never used one myself until a friend gave me one as a gift. It's long and skinny and drapes around your neck to keep your torso warm.
It worked so well that I also started using it to warm the (human) bed...and then I had the idea to make a rice bag shaped like an old-fashioned hot water bottle. Remember those? They always felt so good at the beginning of the night, and then you'd wake to find this cold slab of rubber like a lump in the bed.
Rice doesn't do that.
So here's a quick project to keep your bed warm on winter nights. I like it plain, but I also went ahead and made a second with a Valentine heart on it since I had extra fabric.
This is basically an envelope-style pillowcase around a pillow filled with rice. I made up two simple patterns, which you can download
here and
here. Unfortunately, the patterns won't print to original size (which runs to the edges of the paper) but always add a little margin around the edge. My suggestion for this is to redraw the pattern yourself, or trace around an actual hot water bottle. The only thing you need to remember is that the back pieces must overlap by about 2 inches or so.
Or you can use the patterns as is and have a slightly smaller heat pack.
For the pillowcase/cover, I used a
red fleece. Red fleece is in abundance in the remnant section now that Christmas has passed. Anything over 12" should work comfortably and make 3 water bottles.
My rice pillow was made from a
scrap of muslin. Any tightweave cotton in any color/pattern will work, though, as it won't show through the fleece.
The filling is
2 lbs of rice. Lentils, dried beans, and even clean cherry pits also work. I like rice because it's cheap and relatively fine. I don't think I'd want to roll over onto a sack of cherry pits in the middle of the night. (I also can't imagine how one would accumulate 2 lbs of them in the middle of winter.)
After you print out the pattern, cut around the solid outline and lay it on the fleece. For the front piece, you can just weight the pattern down with your rice and cut around—be sure to add 1/2" for seam allowance.
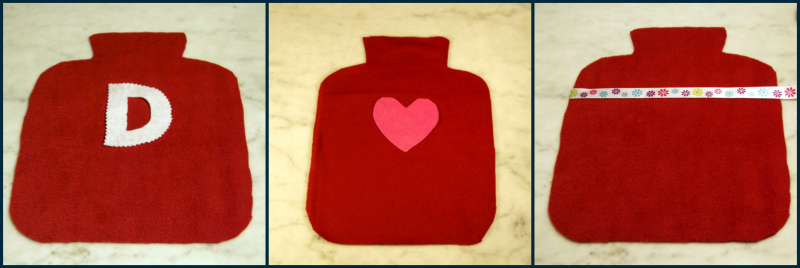
If you want to add the heart, this is where you'll do it. I just cut a pink heart from some scrap felt and zigzagged it to the center front of the fleece. I also played around with adding a felt initial and a strip of ribbon, but it's that time of year, so ultimately the heart won out. Here's what the others look like, though:
The back pieces are a tiny bit more complicated. You need to fold down Pattern 1 along the long dotted line for the lower half—don't cut it, as you'll need to unfold it later. Pattern 2 is the upper half. These two pieces are placed on the wrong side of the fleece (it'll be the side with less pile and fluff) with some clearance. Then you'll take a marker and draw around the outlines of the patterns, as shown below.
Remove the patterns and cut 1/2" around the marks you have made. Hem the straight edges by rolling them under and stitching.
Now you just layer the pieces thus:
- On the bottom is the large front piece, with the right side of the fabric facing up.
- Next is the hemmed top half, right side of the fabric facing down.
- On top of these two pieces is the hemmed bottom half, right side down.
Pin carefully and sew along the lines you've marked. Sew all the way around, overlapping to secure the seam. Trim your seam allowance, clip curves, and turn right side out. You should have a little pillowcase.
 |
| inside out, sewn |
 |
| inside out, seam allowances trimmed, curves & corners clipped |
 |
| right side out, front view |
 |
| right side out, back view |
Now for the pillow. Unfold your large pattern again and refold at the dotted line going across the neck. Draw around the pattern on the wrong side of the fabric as you did above, and cut out 2 pieces with the extra 1/2" seam allowance. Sew on the marked lines, leaving a 2" opening at the top for filling. Trim and notch as before.

Then turn right side out, fill with rice, and stitch closed. If your machine is a tabletop model like mine, it may be easier to place the filled bag to the right of the needle so that its weight doesn't drag down.
And that's all there is. Stuff this rice pillow into your red case, and you are done. The total cost of this project is under $5, and it takes no more than an hour to cut and sew.
To use, heat in the microwave for about 3 minutes. Keep an eye on it to be sure the fabric doesn't get caught up anywhere (ask me how I know this) and take it out when it's comfortably warm. Then tuck it into your sheets just before bedtime. It should keep you or your loved ones comfortably toasty all night.


 Image via Wikipedia