Pages

Wednesday, December 23, 2009

sewing without measuring

Odd-shaped gifts, running out of wrapping paper, a desire for a reusable package, and limited time are all situations which call for a quick little gift bag.


Wrap the fabric loosely around the item and cut to size, leaving space around all edges.
You need a casing, so turn over about an inch of fabric, iron and stitch down. I cut this with the selvage side on top so don't need to finish the edge. Usually the selvage runs up and down in a piece, but this is just a gift bag and we're going for easy--thus, we get to break the rules.
With the casing stitched, fold the bag in half, right sides together and casing on top. Be sure to start your needle in the seam of your casing, not at the top of the fold; otherwise, you will stitch the casing closed. You want to keep the casing open for the drawstring.
Sew the open side and bottom together. Once the bag is stitched closed, the drawstring will fit better if you notch the casing to be even with the side stitching.
Turn the bag right side out. Then estimate how much cording you need for the drawstring (this is clothesline, but you can use ribbon, fleece, felt, or bulky yarn) like so:
Push the drawstring through the casing (I always use a safety pin to do this). Knot the ends, and you're done.
I remember making this type of bag over and over when I was a child. It's probably the simplest, easiest sewing project there is--it needs no measurement or pattern, is sewn with just a few straight seams, and can be modified as needed: two drawstrings instead of one, tucking in corners to give the bag a flat bottom, piecing fabric like a quilt, making a separate casing from contrasting fabric. You can line it. You can add handles and a pocket so it doubles as a tote afterward. You can appliqué a contrasting star to the front. The above bag is about as fast and basic as it gets, but go ahead and play with it, and see what variations you can come up with. That's what making things is about, isn't it?

Wednesday, December 16, 2009

making things at Christmas

I'm not someone who can stand around doing nothing for long, so while I was waiting for yesterday's ginger to crystallize, I started folding pages of a magazine into a tree.

I got this from a page someone tweeted out. I can no longer find the page, which I seem to remember was written by a child in England, but there are numerous tutorials for this all over the web.

It's the perfect thing to do while waiting for something else to happen.

Step 1:


Step 2:


Step 3:


Step 4:


Do this for every page except the front and back covers, which you carefully remove. When you're finished, pull the first page around to meet the last page, and it will stand on its own. Voila!


You could spray paint this, or sprinkle it with glitter. I had some novelty necklaces from previous Christmases, so draped those around for decoration. And after googling all the different ways to make a 3D origami star, it suddenly occurred to me that a little Christmas bow would make the perfect tree topper.
S is busy making things right now, too. He dipped candles with a friend last weekend.


And he painted a cardboard ornament in art class this week.

In the lower left corner of the picture is the birds nest ornament my mother made some 50 years ago from a Brillo pad and felt. Since she died 15 years before he was born, it's nice that their homemade ornaments can hang on the tree together.

Tuesday, December 15, 2009

crystallized ginger

I get a bad jones at this time of year for crystallized ginger. It's sweet, spicy and hot all at the same time. It's also too expensive to consume too quickly, so I wanted to learn to make my own.


The following method is based on Bruce Cost's Ginger East to West, a cookbook I picked up on a remainder table in Singapore and really love--it's written homeschool-style, with a lot of history tucked in between the recipes.


As usual, though, I didn't preview the recipe so did not adhere to the amounts he suggested, or even to the ingredients (he suggests Chinese yellow rock sugar). It still worked. :)


Crystallized Ginger


1 large piece of the freshest, youngest ginger available--look for light-colored, smooth skin
1-2 cups sugar
pinch salt
water


Soak the ginger in cold water overnight. In the morning, drain, cover with more water, bring to a boil, and simmer. Drain and let cool.


At this point the skin will practically slide off, but a sharp paring knife helps. Cut the peeled ginger into pieces. Cost suggests 1/8" slices or the historically-accurate "lacquered chopstick" width. I cut my pieces into rough little cubes, because that's how I like it.


Simmer these pieces in water for 10 minutes; drain and repeat the process. Drain again.


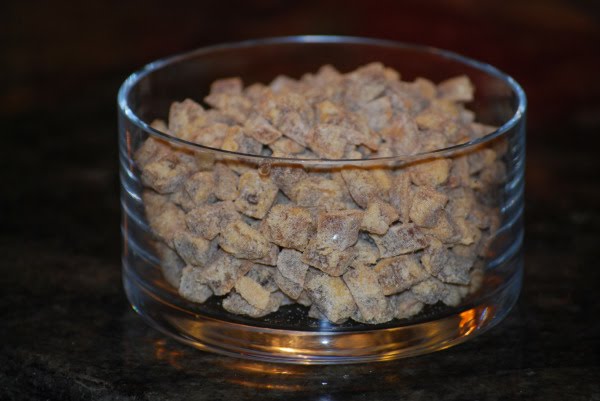
Bring to a boil once again and simmer, this time watching and stirring as the syrup thickens, then crystallizes. It took a bit over an hour. First, it looked like this:
Then this (the syrup is thickening):
And finally, this:


I had been concerned about the fact that my ginger-to-sugar ratio was different from Cost's, but I guess there is a saturation point and the rest of the sugar is yours to sift off and use in making gingerbread men or something equally delicious.


If your ginger is stickier than mine, you can dry it on waxed paper or toss it in extra sugar. I didn't need to do this, so put it straight into a candy dish.

Sunday, December 6, 2009

little christmas stockings


I had a vision of miniature Christmas stockings: stockings to tuck notes or tiny gifts into, to hang on the tree or string onto a garland. I thought it would be easy to find a pattern on the web, and yes, they are there--but not as many as one would expect.

This pattern is lovely--so nicely proportioned, and the tiny button is a sweet accent. I made four of them:

(Yes, the third one has a big foot. It was the first one I made. On subsequent stockings I changed to a smaller needle size after the Fair Isle pattern part and that worked better for me.)

As much as I like the look of these stockings, I really don't like sewing up at the end of the project and then having a gazillion ends to weave in. So I started thinking about a quicker little stocking pattern, one that could be knit up in an hour. I used Dale Baby Ull yarn on all of these because it was what I had. Feel free to substitute with whatever you have:

Little Christmas Stockings
Finished size: 3 inches

Dale Baby Ull Yarn or similar baby weight wool in 3 colors: for cuff (Color 1), body of stocking (Color 2), and heel/toe (Color 3).
Size 1 double pointed needles
Size D crochet hook (approximate)

Cuff
With Color 1, cast on 24 stitches over 3 needles (8 sts per needle) and join in round. K 7 rounds.

Body
Change to Color 2, leaving long tail 18" from Color 1 (this will be used later to create a hanging loop). K 20 rounds, or until Color 2 portion measures approximately 2".

Heel
Divide stitches as follows:
Needle 1: 12 stitches (this is the heel)
Needle 2: 6 stitches
Needle 3: 6 stitches (Needles 2 and 3 are the instep.)

Change to Color 3. On Needle 1, K back and forth in stockinette stitch for 8 rows, ending with a purl row. This is the heel flap.

Turn the heel:
Slip 1, k5, ssk, k1, turn.
Slip 1, p1, p2tog, p1, turn.
Slip 1, k2, ssk, k1, turn.
Slip 1, p3, p2tog, p1, turn.
Slip 1, k4, ssk, turn.
Slip 1, p4, p2tog, turn

Change back to Color 2.
Needle 1: k6 across next row  pick up 4 stitches along heel flap.
Needle 2: k1, k2tog, k6, ssk, k1.
Needle 3: pick up 4 heel flap stitches on other side, K3 from needle 1.

Gusset
Needle 1: k3, k2tog, k2.
Needle 2: k10.
Needle 3: k2, ssk, k3.
Needle 1: k2, k2tog, k2.
Needle 2: k10.
Needle 3: k2, ssk, k2.

Foot
K 8 rounds.

Toe
Change back to Color 3.
K 1 round.
Needle 1: k1, k2tog, k2.
Needle 2: k1, ssk, k4, k2tog, k1.
needle 3: k2, ssk, k1.
K one round even.
Needle 1: k1, k2tog, k1.
Needle 2: k1, ssk, k2, k2tog, k1.
Needle 3: k1, ssk, k1.
K one round even.

Thread yarn on needle and draw through remaining 12 sts. Pull tightly and weave in all loose ends, except for the 18" tail left from the cuff (see above). With this piece, weave just to back of cuff, then using crochet hook, ch st 16 or 3" and loop back, reattaching to stocking; weave in end.

As it turns out, it takes me closer to 2 hours to make these, but I did unknit and reknit a few times along the way. If you're a fast knitter, you may still be able to churn these out.

We did a quick search around the house for things that might fit into the stockings and found the following:

What would you put in yours?